7 min read
Use One Eggplant to Learn the Right Harvest Stage
Choose a variety for your warmest bed and test one fruit’s sheen, firmness and inside texture before picking the rest.
On this page
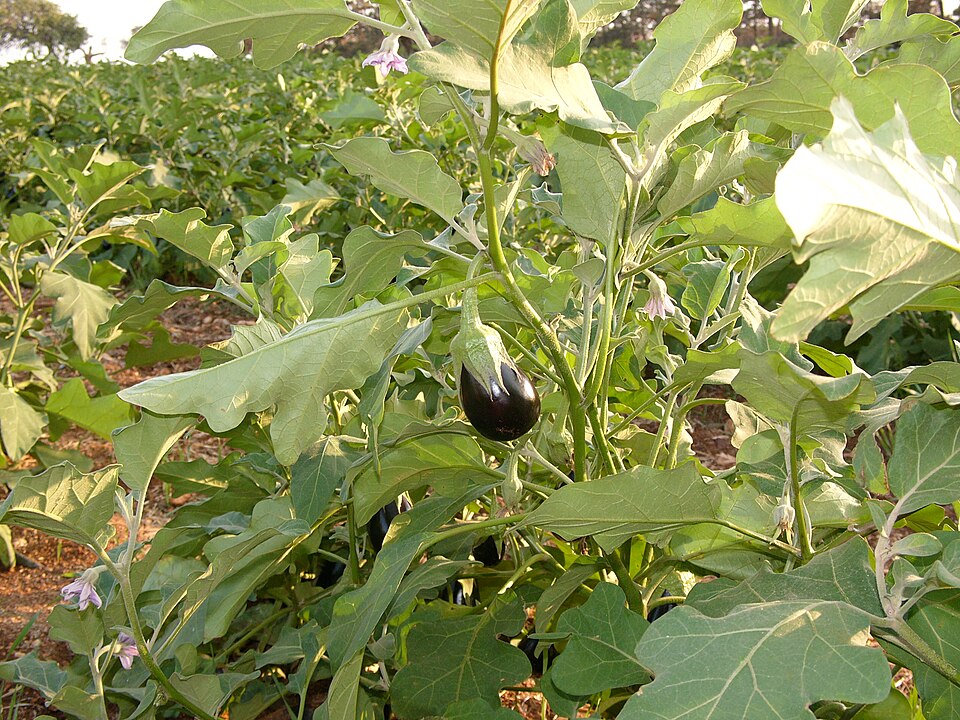
An eggplant can become big enough to see from the path and still be too early to judge the rest of the crop. There are long narrow types and squat round ones, and mature fruit can be white, purple, striped or other colors. Use the plant label to learn the usual size, then use one representative fruit to learn what the useful stage looks like in your garden. Look for sheen and firmness before cutting. An indoor slice can tell you much more about the next picking than repeated guessing by weight from the path.
Eggplant is a warm-season crop. It takes good growth and suitable temperatures to produce fruit consistently. Choose a named cultivar with time to mature in your area and make it possible to reach and support its branches. Do not depend on every cultivar reaching the same dimensions before picking. A compact plant with small fruit can be useful in a warm protected spot, and a large plant may need enough room and support for several heavy pieces at different heights.
Match the young plant to a warm place
Choose a sunny location with draining soil. In a cooler region, pick the area that warms reliably and does not receive all of the cold wind from an exposed opening. A protected bright bed or suitable container may give enough warmth if the season is short. Use locally suited early varieties and seedlings where that is appropriate. Start under cover only as early as you can give the plants sufficient light and room. A tender plant kept crowded or cold can lose much of the advantage of an early sowing.
Acclimate young plants to outdoor light and wind gradually. Transplant once the soil has warmed and local frost risk has passed. Use the size and spacing specific to your cultivar, with room to inspect the soil beneath the canopy and reach the fruits later. Set the roots so they can establish into the surrounding soil and water them in. Leave space for air and do not overfeed just to make the plant look strong before it flowers. Use a soil test and regional growing guidance where available.
Pick a support you can reach once the growth is heavy. Some plants benefit from a stake or small cage, particularly where several fruits weigh down a branch. Put it in early before the roots make it hard to add. Leave soft ties loose around stems and keep fruit from pressing against hard edges where practical. A mature branch that folds over a wet path is more difficult to support safely than a young one you can gently guide. Keep the approachable side open before nearby plants fill it.
Observe one fruit as it changes
Choose an average early fruit and keep its location in a note or photograph. Watch it slowly acquire the expected shape and color. Look from the same angle in daylight. A glossy sheen commonly goes with the tender harvest stage, though cultivars and light conditions vary. Do not compare shine in direct midday sun with shine under an overcast sky as if they were the same test. Check the behavior of the same fruit and use the seed supplier's description of its usual size.
Press the skin gently with a finger when it is firm enough to check, avoiding bruising. A suitable fruit generally gives slightly and springs back. An older fruit may become dull and have tougher flesh and more developed seeds. Use those signs together. A dull patch where the fruit rubbed a support has a different cause than an overall loss of shine. A broad change in firmness or a soft decayed area warrants separate inspection. Do not squeeze multiple pieces hard just to determine whether they are ready.
Do not keep the selected fruit on the plant solely because you want a particular length. Many varieties taste best before maximum size. Take a sound trial fruit when it reaches a substantial part of the expected mature size and has the sheen and firmness you want. If the first is small but already useful, use that as the early benchmark. If it proves too immature, let another comparably placed fruit grow a little longer and record the conditions during those days.
Cut the stem and check the inside at home
Use clean pruners to cut through the stem. The part immediately above the fruit, the calyx, can be prickly on many varieties. Wear gloves as needed and avoid twisting the whole branch to remove a fruit. Keep a short piece of stem if that is convenient for handling, and put the fruit into a container with enough room so it does not become scratched by the stem of another one. Leave healthy branches and developing flowers in useful positions.
Slice a sound fruit and look at the flesh and seeds. Tender fruit at the stage you want normally has flesh suited to the dish and seeds that have not become overly hard. The inside may tell you more than sheen alone. If you found a good texture, write down the length, width and flexibility of the skin. Use the information as a working guide for the next few fruit on that cultivar. When two varieties share a bed, keep those notes separately. A small round type and a long thin type need not reach comparable lengths to give good quality.
Handle picked fruit carefully and keep it out of prolonged heat or direct sun. Follow normal washing, storage and preparation guidance. Use sound fruit at the stage you want. Separate badly damaged or spoiled pieces while you are gathering rather than carrying them in contact with the rest. A shallow container helps prevent a heavy fruit from resting on a more delicate one. Notice where the best fruit was easy to reach. That can affect whether you want another plant of the same size in the space.
Compare fruits on the plant before choosing another variety
Pick two sound specimens of the same cultivar during one period, leaving a few days between them if the crop has enough fruit. Choose similar positions when practical. Put both observations on the same small label: external sheen, how the skin felt and how firmly the seeds had developed. A glossy fruit from a shaded position and a dull older one near the top are useful only when you also consider their stages and growing conditions. Color is one piece of that information. It may be markedly different on opposite sides of the same fruit without telling you when the interior reached the texture you want.
If your first fruit was slow to size, check the history of the plant. A cold spring, uneven irrigation or a crowded root area can delay fruit growth. One large fruit may also sit alongside many small ones for some time. Support the branch if needed while you wait for the signs appropriate to the variety. Do not change the expected stage simply because the first plant took longer than the ones you saw in a nursery picture.
At the next picking, choose a piece for a specific dish. A long mild fruit can be useful sliced across and a small round one can give a different yield from a single cut. Keep the comparison centered on the purpose you had when you ordered seed. A crop that held its sheen into a manageable size and sliced easily was useful even if it did not reach the largest diameter advertised on the packet. At the end of the season, bring those measured stages and the time needed to reach them to your next choice of seed.
Follow what the plant does after the first picking
Maintain reasonably steady moisture while flowers and fruits are developing. Inspect the root zone during warm dry spells, then water as needed and allow drainage. Look at branches that are still carrying fruit after the first harvest. A low stem with weight on its tip may need a discreet loose support, while one that does not block access can stay in its ordinary position. Avoid taking healthy leaves simply for a better view if you can move the approach or look from the other side instead.
Check for leaf injury, pests or other problems when you can see the plants clearly. Don't diagnose an unfamiliar blemish from a damaged piece in the basket alone. Look at the whole plant and the part of the bed that experienced the problem. If fruit sizes are uneven between plants, compare cultivar, light, water and stage before adding fertilizer. A careful record attached to the plant is useful even if the problem turns out to be one unusual season.
At the last picking, note the first good inside texture and the weather that accompanied it. Consider which variety produced the amount you actually used and which shape was easy to inspect. A short plant with a few conveniently placed fruits may have been more productive for practical purposes than a taller one with hidden pieces far beyond the stage you wanted. Keep the useful stage in mind rather than expecting each cultivar to look like the last one you grew.
Further reading: University of Illinois Extension guide to eggplant.