7 min read
Know When to Cut Garlic Scapes
Read the curl of a hardneck garlic scape, cut it cleanly and keep track of the bulbs still growing below.
On this page
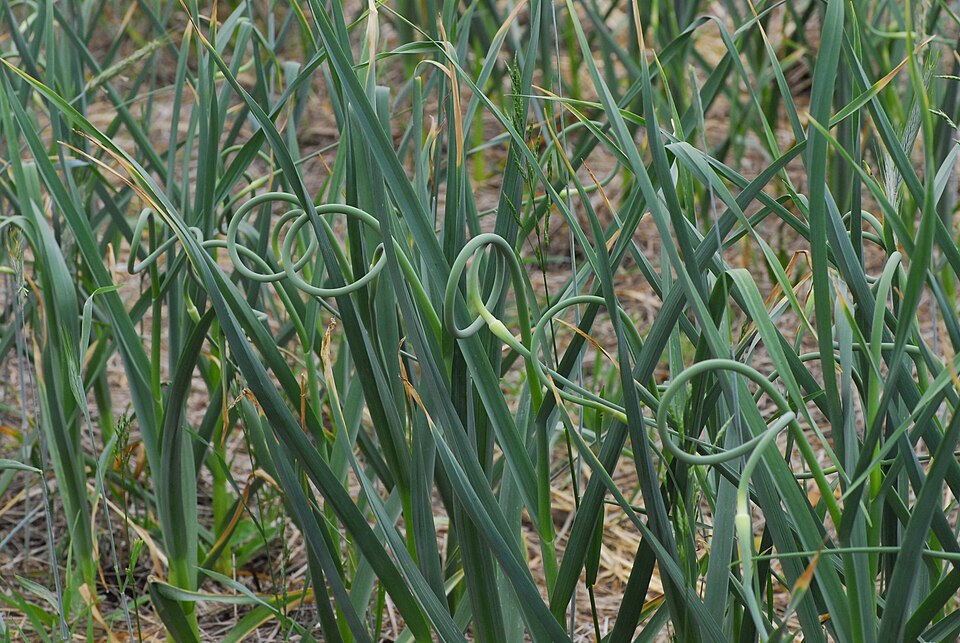
A garlic bed tells you when scape season begins. The leaves still look much as they did the week before, but a round stalk emerges through the center of a few plants. It rises above the leaves, bends, and may go on to make a full loop. At its tip is a swollen, pointed sheath. Within days you can have a harvest in your hand, even though the underground bulbs need several more weeks. The useful decision is between taking those stalks while they are tender and deliberately leaving a few to see how they develop.
Give the row more than one visit. Even plants of the same cultivar may form scapes on different days. Several named varieties in one bed make the gap more conspicuous. A plant that is ready to cut today can stand beside one whose scape is still emerging through the middle. Inspect first and then cut in batches. The bulbing crop stays in place, and the spring harvest becomes an extra pass through the bed instead of one event you have to get right for every plant at once.
Tell the scape from the leaves
Hardneck garlic generally produces a prominent scape. Softneck garlic usually lacks the familiar curled stalk, although growing conditions and variety can affect what you see. If you want predictable scapes next season, buy clearly labeled hardneck planting stock suited to your climate. Record the cultivar at planting and put a durable label by the first plant in each block. A row marker is more trustworthy than a photo of the bulbs you ordered months earlier.
A true scape is rounded and emerges upright from the center of the leaves. The garlic leaves are blade-like and folded or creased. Viewed from either side, several can overlap and seem to form an extra stalk. Follow the stem you plan to cut all the way down to where it emerges. It should be possible to hold the round stalk separately without gathering leaves in your hand. The pointed swelling toward the top encloses the developing flower cluster and often produces small aerial bulbils. A leaf tip is usually flat and lacks that enlarged section.
If you are unsure about a particular plant, mark it with a small stake and look again in a few days. Do the same for the earliest scapes on a new cultivar. Some have a broad, open bend, while others coil tightly and later straighten. Chasing an exact number of turns can cause you to miss many stalks at their best. A first bend or curl, while much of the lower stalk is still pliable, is a better guide. A thickening, straightening stem with a firm pointed upper sheath will usually need more trimming in the kitchen.
Find a useful harvest stage
Cut one trial stalk from each variety as the earliest scapes begin to curl. Bend a section near its base. Compare the part that snaps or cuts easily with the portion that resists the knife. The lower part generally becomes stringier with age. If the goal is to chop the narrow stalk finely or sauté tender pieces, favor the earliest harvest. Stalks that are already somewhat firm may still have tender sections near their upper ends. Separate those sections before cooking a large batch.
You can decide to leave several scapes if you want a photographic record or a display. Keep those marked with a different label. Removing scapes is common practice when the priority is harvesting bulbs. Leaving selected stalks gives you a visible comparison and the chance to observe bulbils, but the comparison works only if the plants were similar to begin with. A vigorous plant in a sunny part of the bed is a poor control for a small specimen at the edge. Compare neighboring plants of the same cultivar, and remember that a home trial is a guide for your own planting rather than a broad yield study.
Set aside stalks that are obviously diseased or badly damaged. If yellowing, distorted leaves or decay appear on several plants, take pictures of the whole patch as well as close-ups. A local extension or horticultural adviser will have more to go on than a description of the scapes alone. Do not pass suspect bulbs or bulbils to other gardeners as planting stock. Shared garlic is best reserved for plants you have inspected over the season.
Cut with the leaves still attached to the plant
Choose a time when the foliage is dry and you can clearly see the base of each scape. Use clean, sharp snips. Hold the scape above the topmost leaf and cut the exposed stalk without reaching down into the funnel of leaves. Taking the longest possible stem is rarely worth nicking the leaves that remain on the plant. Leave the flat blades intact. They still intercept light during the weeks when the bulb develops and their condition will help you decide when to lift the crop.
Gather the cut ends in one direction in a shallow basket. Long coils interlock easily. If you drop a handful across the plants and pull it along the row, it can snag other scapes and crease leaves. Label the basket if you are comparing varieties or ages. At home, keep the scapes cool. Rinse them under running water when preparing them, remove tough basal ends, and cut a test piece before mixing a whole batch. An older stem that seems tough raw is unlikely to give the same texture as a thin young one.
Keep the two harvests separate in your notes. A single line can record the scape date, how tender the first round was, and which plants were left for comparison. Reserve another line for the date and size of the first bulb you lift. Next year that record is a better reminder than the month on a recipe page. Cultivars, winter conditions and weather during late spring can move the date by a meaningful amount, even in the same bed.
Carry the bulb crop through its final weeks
Continue to look below the surface when deciding whether the row needs water. The scape harvest can make the season feel nearly over, particularly once the tips of the oldest leaves fade. The bulbs are still growing, and damage to the remaining foliage will affect the rest of that year's crop. Water while the root zone is drying during active growth, and avoid soaking the bed close to lifting time. A sandy bed and a heavy clay bed respond differently to the same shower. Check an open spot close to a plant rather than lifting the whole mulch cover every time.
Weed late growth by hand where a hoe could slice a bulb or cut deeply among the roots. If a shallow mulch is in place, keep it loose and look underneath after heavy rain. A wet mat against the stems can hide problems and hold water where you want air. Should a single plant wilt much earlier than its neighbors, investigate that plant before changing how you water the entire bed. A compacted or low patch in the row can stay wet long after the soil outside it looks dry.
Use a trial bulb to confirm timing
As the lower leaves brown and some upper leaves remain green, lift one average bulb to check progress. Dig a little to the side with a fork, loosen the soil from below and lift the plant by supporting the bulb. Avoid pulling hard on the neck. After a dry spell in tight soil, a bulb can be damaged by the force needed to pull it straight upward. Inspect where the cloves meet under the wrapper. The bulb should feel well filled, with wrappers still holding it together. If you wait until most wrappers break down and the cloves separate, the bulb may be less suitable for storage.
Different cultivars can mature at different times. Sample the next cultivar on its own timetable. It helps to put a tag in the ground at a change of variety even if you already have a diagram. Two rows can look identical just when you need to know which one to dig. Keep bulbs with torn wrappers or bruises separate and use sound ones from that group before the long-term storage crop. Cure intact, dry-surfaced bulbs out of direct sun with room for air to circulate around the stems and roots.
Make the bed easier to read next year
Before you put away the last bulbs, compare this year's notes with what you remember eating. If the tastiest scapes came from the first walk, plan two inspections in the following week rather than leaving the harvest to one weekend. If late stalks kept getting tough while you were still using the first batch, reduce the number of plants in the earliest block or choose cultivars that scape at different times. The ease of harvesting and using them is worth tracking alongside bulb size.
Where the first few plants scaped early at a warm edge against a path, leave those plants in your frame of reference next spring. They can serve as an early signal that the rest of the bed is about to change. A simple flag by one early plant tells you where to check in a hurry. There is also no need to cut a few late scapes merely because the rest are gone. Wait until they offer something worth picking. A garlic bed that you visit regularly will tell you more about timing than a calendar prepared before the first leaves open.
Further reading: University of Minnesota Extension on growing garlic.